Managing sessions
- Conducting sessions
- Printing sessions
- Tracking attendance and participation during a session
- Seating Chart filters
- Accessing user details
- Viewing session statuses in Seating Chart
Conducting sessions
Launch sessions from the Seating Chart tool and the Calendar tool. When you select a seating chart, a searchable list of all the sessions added to the seating chart displays first.
When you click on a session, it starts automatically and remains in progress until you click  Set Session Completed. This locks the attendance, participation tracking, and comments you entered for the session.
Launch a session from Seating Chart
- On the main Seating Chart page, click on the seating chart that contains your session.
- Click on your session to launch it.
Launch a session from Calendar
In the Agenda view, click the View Seating Chart link beside the event you want to launch the session for.
Complete a session
Inside a session, click Set Session Completed..
Note This finalizes session statistics. Overall course statistics are calculated using statistics from finalized sessions.
Resume a session
Inside a session, click  Resume Session at any time to add to or modify the session tracking data.
Printing sessions
Print a session from Seating Chart
- Click on the seating chart you want to print.
- Select an event.
- Click the
 Print icon.
- Click Print on the print preview screen that appears and follow the prompts.
Print a session from Calendar
- Select an event from the Agenda view, and click the View Seating Chart link.
- Click the Print icon.
- Click Print on the print preview screen that appears and follow the prompts.
Note If you are enabled to view seating chart statistics, printing a session includes the participation scores for the session in the print view.
Back to top
Tracking attendance and participation during a session
Use sessions to track your students attendance and participation during lectures. You can also add, edit, and delete user-specific comments during sessions.

User summary overlay
Track attendance and participation during a session
- Select the user you want to track from the session's seating chart to bring up their user summary overlay.
- Click
 Present to mark them present, or select
  Unexcused Absence or
  Excused Absence by clicking the Absent button.
- Once you mark a user as present, adjust their participation and cold call scores using the
 Less and
  More icons.
Note You can award negative scores for participation, but not for cold calls.
- Click Add Comment to give personalized session feedback.
- Click anywhere outside the user summary overlay to return to the session.
Note All changes save automatically inside sessions, including adjustments made to user summary overlays.
Understanding cold calls
Use the cold calls feature to track the number of times you request a response or comment from a student in class who has not volunteered to participate.
Note The  Cold Call icon appears beside the student name on the seating chart when you mark a student who has been cold called during the session. This helps you track users you have called on in sessions.
Back to top
Seating Chart filters
Use Seating Chart filters to facilitate individual and group performance tracking per session. Customize the filters according to your preferences and grading scheme. From inside a seating chart, click the  Edit Filter Settings icon to modify filters.
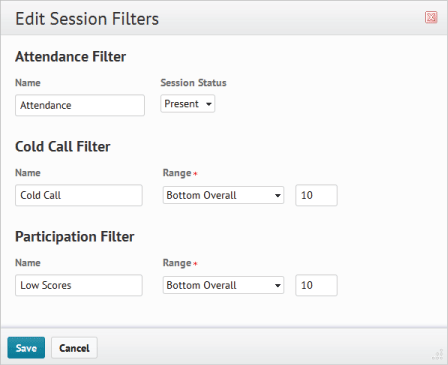
Edit Session Filters view
Filters allow you to use the overall attendance, cold call, and participation scores in a session to highlight students that match your custom criteria. On this screen you can:
- Change the name of the filters that appear on the seating chart view.
- Set the attendance filter to highlight Present or Absent students.
- Set the cold call and participation filters to highlight the bottom overall, top overall, bottom of the session, or top of the session students.
- Set the number of students to display when the cold call and participation filters are selected.
Back to top
Accessing user details
This area provides a detailed view of all comments and overall statistics for a student in the course. You can add and edit general comments about the student's performance here.
Access user details
- On the Seating Chart page, click the seating chart you wish to view user details for.
- In the Students area, click the user's name to view user details.
OR
- On the Seating Chart page, click the seating chart you wish to view user details for.
- Click the session you want to view user details for.
- Click on a user inside the seating chart.
- Click the View Details link to view the user's details and comments for the course.
Back to top
Viewing session statuses in Seating Chart
The following are possible session statuses that can display beside seating charts:
- Not Launched/No Session Seating charts with sessions that have not been launched, or that do not have sessions attached to them, display no icons beside their seating chart name.
- In Progress Seating charts with sessions in progress have an
 In Progress icon beside the seating chart name. They also display a blank box (
 ) that fills in with a participation score for the session and a color symbolizing the session threshold value once the session is complete.
- Complete Seating charts with complete sessions have a box (
 ) where the number indicates the participation score for the session and the color indicates what threshold value the session attained. For more information about threshold values, see Visualizing student progress.
Click the seating chart to go to the events page for that chart. Seating charts with more than one associated event display a session statistic number and color to indicate participation threshold results beside each completed session.
Back to top
