Analytics Portal Tool
The Analytics Portal is for displaying reports from the Analytics environment directly inside Learning Environment. This integration provides several advantages over accessing Analytics directly:
- It allows instructors to access Analytics reports for their specific courses.
- It utilizes the security of Learning Environment to access Analytics.
- It incorporates Learning Environment-style navigation and filtering controls that are more familiar to instructors and administrators.
- It can be controlled and customized by an administrator to determine which reports are available to specific roles and/or specific users.
-
Granting access to Analytics Portal
- From My Home, click the Roles and Permissions link in the Security section of the My Admin Tools widget.
- On the Role List page, click the
 Edit icon for the role.
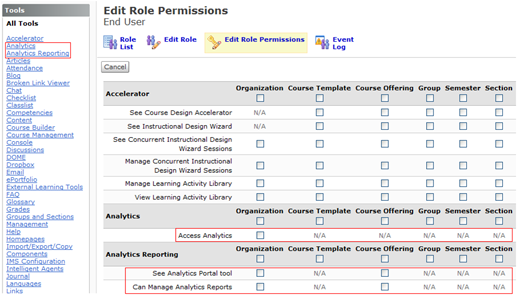
- In Analytics Report tools area, select the check boxes for the organization or course offering org unit for:
- See Analytics Portal tool
- Can Manage Analytics Reports
Add the Analytics Portal link to a navbar
- Click the Edit icon for the navbar.
- Select Analytics Portal tool from the list of links.
Access the Analytics Portal Tool
Click the Analytics Portal icon located on the navbar on your course homepage to access the Report Lists page.
Note Contact your system administrator or your Desire2Learn Account Manager if you do not have access to Analytics and believe that you should. Reports generated by Analytics can also be requested by instructors and other roles in your organization using the new Analytics Portal tool (available in the 1.2.0 release of Analytics).
Analytics Reporting
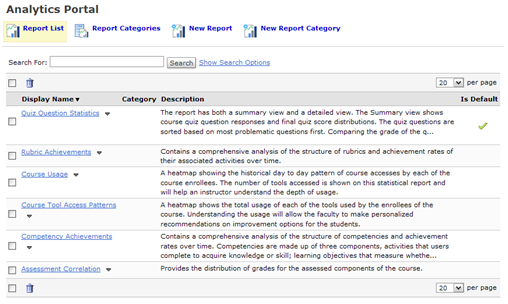
After you click the Analytics Portal icon, the Report List page appears. This screen presents the available list of reports that are available according to a particular role (e.g., an administrator or an instructor), and/or specific users within Learning Environment. From this page you can select from among the following four options on the tool bar:
- Report List (current view)
- Report Categories
- New Report
- New Report Category
The Report List page presents the available list of reports that are available according to a particular role (e.g., an administrator or an instructor), and/or specific users within Learning Environment.
Register a New Report
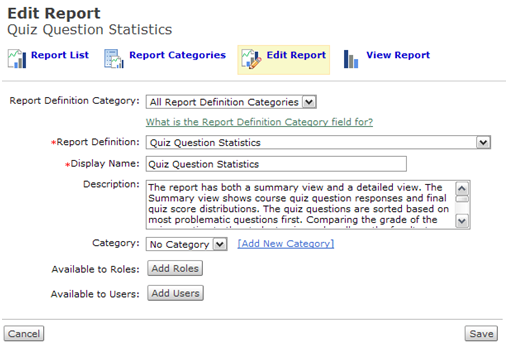
- Click New Report on the tool bar on the Report List page (for example, Quiz Questions Statistics).
- From the New Report page, select a Report Definition Category to filter the available reports based on category.
- Select a Report Definition. This filter contains the list of available reports based on the applied Report Definition Category.
- Enter a Display Name if you want to overwrite the default.
- Enter a Description if you want to overwrite the default.
- You can select an existing Category, or add a new category by selecting the Add New Category text next to the Category filter. New Categories require a Display Name and have an optional Description.
- Select the Add Roles button to make the report available to specific roles.
- Select the Add Users button to make the report available to specific users.
- Click Save to finish, or Save and New to begin another report.

Registering a Report
Edit a Registered Report
- From the Report List page, click the arrow next to a report Display Name.
- Select Edit Report from the context menu.
- Make your changes.
- Click Save to finish.
Editing a Report
Set a Default Report
- From the Report List page, click the arrow next to the report name.
- Select Set as Default.
Note Only reports without filters associated to them can be set as default reports.
Change a Default Report
- From the Report List page, click the arrow next to the report name of the default report.
- Select Set as Not Default.
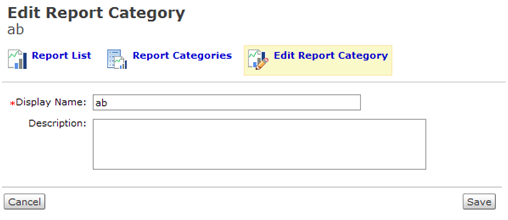
Edit a Report Category
- From the Report List page, click on the Report Categories option from the tool bar.
- On the Report Categories page, click on a category Display Name or the arrow next to the Display Name. If you click the arrow, select Edit Report Category from the list of available options.
- Once changes have been made, click Save to finish.
- From the Report List page, click the Report Categories option from the tool bar.
- On the Report Categories page, click a catagory Display Name.
- Make your changes.
- Click Save to finish.
Editing a Report Category
Run a Report
- From the Report List page, click on the desired report's name.
- Use the Report Filters (from top to bottom) to make your selections.
- Select the Run Report button from the tool bar.
- From the Report List page, click the name of the report you want to run.
- Use the Report Filters (from top to bottom) to make your selections.
- Click the Run Report button on the tool bar.
Note The Report Filters and Report Description can be collapsed to make additional space on the screen for the report. This can be done by using the Hide Filters button on the tool bar.
Report List Page
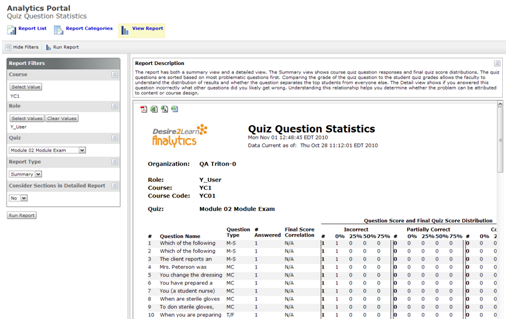
Quiz Question Statistics Report
You can export reports in the following formats:
- PDF (includes graphical content and images)
- CSV (text only)
- Excel XLS (text only)
- Excel XLSX (text only)
