
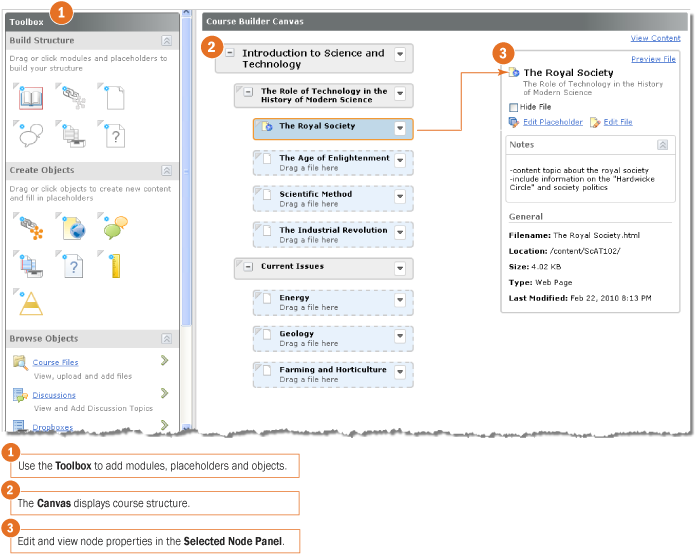
The Course Builder user interface consists of three sections: the Toolbox, Canvas, and Selected Node Panel.
Course Builder user interface
You can add modules, placeholders and objects to the canvas from three areas within the toolbox: Build Structure, Create Objects, and Browse Objects.
Build Structure provides you with module and placeholder elements that you can add to your canvas to create your course outline.
Create Objects provides you with a selection of objects you can create and add to the canvas or drag onto placeholders on the canvas. Direct access to object types within Course Builder enables you to bypass the complexity of setting up objects in their individual tool areas. You can create and add the following objects to the canvas:
Browse Objects displays a library of pre-existing objects in your course tools. From Browse Objects, you can locate and add these pre-existing objects to the canvas or drag them onto placeholders on the canvas. If you want, click on pre-existing objects in Browse Objects to view their details and associated grade items or learning objectives before you decide to add them to your course structure. This section of the toolbox features a drill-down menu with breadcrumb links that appear at the top of the toolbox as you navigate deeper into the menu. You can click on breadcrumb links to return to a previous section.
The canvas is a visual representation of your course structure. It displays the hierarchy of your course content as a series of nested nodes.
Node Each structure element on the canvas is called a node. Node is a general term that can represent a module, placeholder or object.
Each node on the canvas includes an icon indicating its type. This can help you to see what's in your course at a glance.

A dropbox object node
The canvas simplifies the process of rearranging, copying, and deleting your course structure. See Managing nodes on the canvas for more detail about these actions.
Tip Once you're satisfied with the arrangement of your course, you can click View Content to see how your course content displays for students.
When you select a node on the canvas, the selected node panel displays its details and enables you to perform actions on that node. From the selected node panel, you can: