Post-production editing with the Producer tool
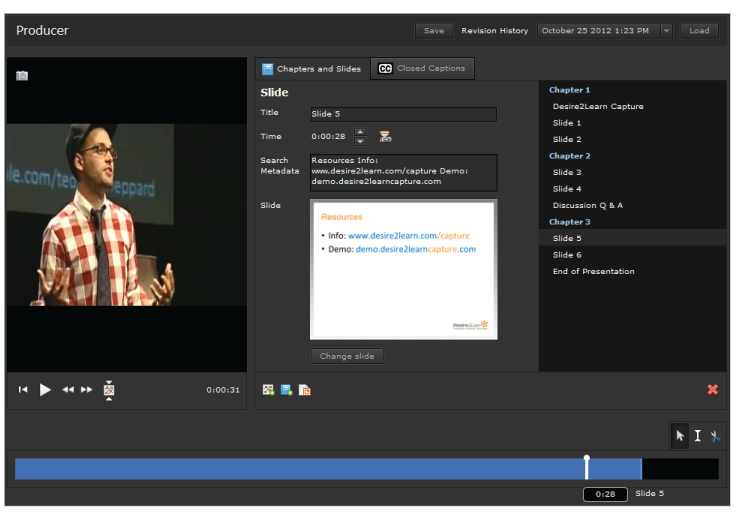
The Producer tool enables you to make simple edits to published CaptureCast presentations. You can cut segments from audio or video files, add or remove chapters, insert files, manage slides, and include closed captioning subtitles.
Tip If you do not want users to see unedited presentations after they are published, create a password-protected folder and save presentations there. When you are done editing, you can move the presentations into a public folder.
Important The Revision History drop-down list indicates the date and time of previously saved versions of the presentation you are editing. The most current saved file opens the next time you access Producer, but it will not appear in the revision history until your next Save.
Producer tool
- Accessing Producer
- Editing audio and video
- Editing slides
- Editing chapters
Accessing Producer
Access the Producer tool
- Do one of the following:
- Log in to Capture Portal and click Admin.
- In Learning Environment, click
 Capture Central on your course navbar.
- In the Manage Content area's On-Demand section, click Manage Presentations.
- Click the
 Post-Production icon beside the presentation you want to edit.
Load a presentation from revision history
- Select a date and time stamp of a revision from the Revision History drop-down list.
- Click Load.
Editing audio and video
Cut audio and video content
Note Cut segments are not permanently removed from the presentation, but they will not appear to viewers.
- Click the
 Marker icon.
- Click along the timeline bar to add your markers. Add as many markers as you need to create the segments you want to cut. The
 Add Marker icon appears as you hover your cursor over the timeline bar. If you want to remove a marker, hover your cursor over it and click the
  Remove Marker icon when it displays.
- Click the
 Cut icon.
- Click
 Cut between the segment you want to remove.
- Click Save.
Restore cut audio and video content
- Click the Cut icon.
- Click
 Uncut on a previously cut segment on the timeline bar.
- Click Save.
Back to top
Editing slides
Upload a presentation file
Upload presentation files if you want to add new slides to a presentation. Capture supports DOC, DOCX, PPT, PPTX, and PDF file formats.
- In the Chapters and Slides area, click the
 Upload presentation file icon.
- Select your file.
- Click Upload Another if you want to add another file. Click Done when you are finished.
- Click Save. You can now click the
 Add a new slide icon to find the presentation file and add it to your slideshow.
Add a slide
- In the Chapters and Slides area, click the Add a new slide icon. If you are editing a presentation with existing slides, by default a slide is automatically selected and loads when you choose to add a new slide.
- Click Change slide to select the slide you want to add.
- Click on your slide, then click Select slide.
- Enter a Title and set the
 Time to position the slide.
- Click Save.
Edit a slide title
- In the Chapters and Slides area, click on the slide you want to edit from the chapters and slides list.
- Enter your text in the Title field.
- Click Save.
Change a slide position
- In the Chapters and Slides area, click on the slide you want to edit from the chapters and slides list. The
 timeline marker indicates where the slide appears during the presentation.
- The following are ways you can change a slide's position:
- Set the Time to adjust when the slide appears in the presentation.
- Drag the timeline marker to the position where you want to place the slide.
- Click the
 Set time to current playback position icon to set the slide's time to the current playback position.
- Click Save.
Tip Double-click on a slide's name in the Slides and Chapters list to start playback at the slide's location in the presentation.
Delete a slide
- In the Chapters and Slides area, click on the slide you want to delete from the chapters and slides list.
- Click the
 Delete icon.
- Click Save.
Edit slide metadata
Tip Slide metadata enables users to locate slides and associated playback positions with Capture Portal's Search field.
- In the Chapters and Slides area, click on the slide you want to edit metadata for from the chapters and slides list.
- Click Change slide.
- Double-click the Search Metadata text field.
- Enter the metadata, then click Save.
Back to top
Editing chapters
Add a chapter
- In the Chapters and Slides area, click the
 Add a new chapter icon.
- Enter a Title and set the Time to position the chapter.
- Click Save.
Change a chapter position
- In the Chapters and Slides area, click on the chapter you want to edit from the chapters and slides list. The
 timeline marker indicates where the chapter appears during the presentation.
- The following are ways you can set a chapter's position:
- Click the Time to adjust when the chapter appears in the presentation.
- Drag the timeline marker on the timeline bar to the position where you want to place the chapter.
- Click the Set time to current playback position icon to set the chapter's time to the current playback position.
- Click Save.
Edit a chapter title
- In the Chapters and Slides area, click on the chapter you want to edit from the chapters and slides list.
- Enter your text in the Title field.
- Click Save.
Delete a chapter
- In the Chapters and Slides area, click on the chapter you want to delete from the chapters and slides list.
- Click the Delete icon.
- Click Save.
Back to top
See also
